Create a short “How to … “ guide to help other beekeepers. Topics can be your own idea or can be selected from the following list of titles: “How to recover wax”, “How to make candles”, “How to prepare a sample for microscopy”, “How to carry out an artificial swarm”, “How to prepare exhibits for a honey show”, “How to make Mead” etc. Please incorporate any relevant health and safety advice into your guide.
| Entrant ID: | 1043969 | Entrant Name: | Sue Lang |
| Entry: | How to prepare honey entries for a honey show.
Runny Honey
Soft set honey
Naturally granulated honey.
|
||
| Result: |  |
||
| Entrant ID: | 1042148 | Entrant Name: | Wally Thrale |
| Entry: | Adding wooden slats to zinc queen excluders.
My first queen excluders when I started beekeeping were the Waldron type, i.e. wooden edge around a wire mesh. They are not cheap but when they are placed on the brood box they do not squash bees. However, I found over time that the wood at the corners became worn and, eventually, they broke up and became unusable. So rather then spend a lot of money replacing like for like I bought the cheaper zinc type queen excluder. The issue with this type of excluder is that bees can be squashed, especially when the first super is returned. The issue of squashing bees has become more important over the years and I do try to find ways to avoid it if possible. So I needed a solution when using flat excluders which avoided buying the more expensive type. One day whilst walking around a timber yard I noticed that slats of wood were discarded in waste bins and, fortuitously, they were just the right thickness to make sides for the zinc excluders. They were about 8mm thick and 30 to 45mm wide in lengths up to a metre. The right thickness but too wide. However, I bought a jig saw from Aldi which allowed me to cut the pieces in half lengthways so they were then 15 to 22mm wide. In order to assemble my Waldron type excluder I needed to hold the top and bottom slat firmly together with the excluder in the middle. So I bought a couple of small G clamps from a Pound shop for a few pounds. The clamps allowed me to place a slat under the excluder and another on top to hold everything in place. The next step was to drill two holes through the top slat and through the zinc as well but not into the bottom slat. In order to achieve this the drill bit was reduced to the required length in the chuck to prevent making a hole in the bottom slat. The slats were fastened with two screws from the above; the excluder turned over and a further two screws added. The whole process was repeated with the opposite end of the excluder. Opposite ends of the excluder now have slats affixed. The distance between opposite slats was measured for the side pieces and slats cut to the required length. These were attached as already described. Note that It is important to screw through the top and bottom slats as it makes the framework stronger when removing the excluder from the brood box. Excluders are always propolised firmly by bees and screwing through from top and bottom gives added strength. I do not recommend using this method with plastic excluders as they are not rigid enough. All of this was cheap to produce which is in keeping with the beekeeping philosophy – make do with materials that are to hand especially ones that are free!
|
||
| Result: | – | ||
| Entrant ID: | 1038006 | Entrant Name: | Colin Hall |
| Entry: | How to do Cut Comb
Your chosen frame of honey for cut comb should have soft new wax. It should be reasonably filled out, ideally a little wider than the top bar of wooden frame, and very well capped. It would probably come from a top super of well-flavoured summer honey so that there is no pollen in the cells. Certainly, avoid honey that is likely to granulate quickly such as OSR. Because the wax is fragile, it will need very careful handling. Hygiene is important so wear thin latex or nitrile gloves. Aim for a perfectly shaped, simple, near-natural product. Early preparation:
Removal and choice of frame:
Cutting:
Draining:
Boxing up:
Storage:
|
||
| Result: |  |
||
 r cut comb should have just a starter strip of special thin foundation attached to the top bar (say a quarter of a normal sheet). Unwired, of course!
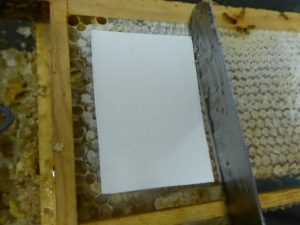 Aim to produce a perfect rectangle of cut comb that will fit perfectly into the box. To do so, make a template out of card. For Thorne’s Crystal Comb Containers, it should be 3.5 ins by 2.5 ins.
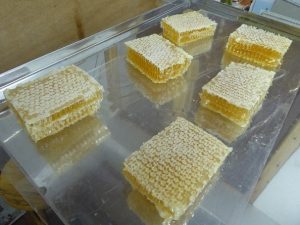 honey can drain off, leaving for several hours. Placing it on a mount helps, also making the next stage easier.
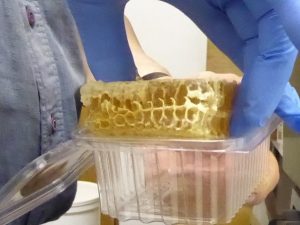 the freezer for a week in case of any wax moth. Allow to thaw out to room temperature before use.
| Entrant ID: | 1042567 | Entrant Name: | Gill Brewer |
| Entry: | 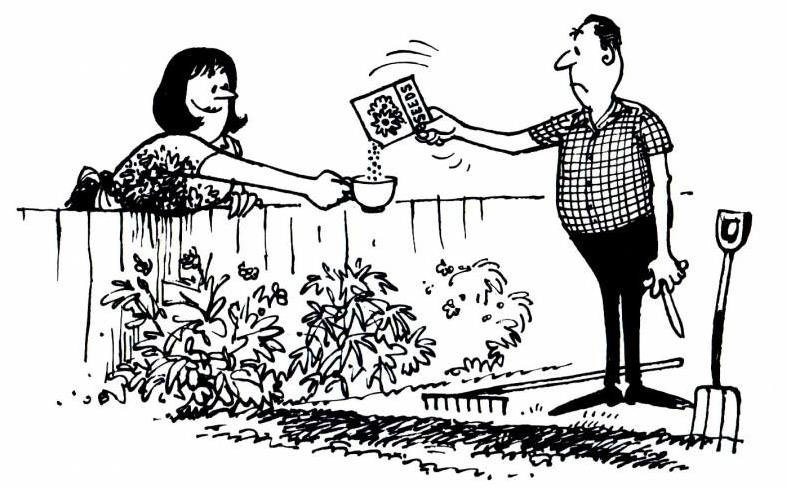 How to be a Good (Beekeeping) Neighbour. How to be a Good (Beekeeping) Neighbour.1. Happily lend frame nails to your neighbour the evening they need to hive a swarm, or jars when they suddenly need to bottle honey on Christmas Eve. And sterilize and promptly return any equipment you borrow. 2. Stand on your friend’s ladder when they’re retrieving a swarm from a tree and don’t mind a few bees being shaken onto your head. 3. Forego the derby match on TV in favour of an evening of manual labour helping your neighbour move hives. 4. Breed from your best-behaved colonies and cull queens from any colony that is aggressive/ defensive /followy /nervous… (call it what you will, but we all know the one don’t we, that one we leave till last, where we dread lifting the queen excluder). This ensures there are plenty of docile drones and fewer with unpleasant traits in the local gene pool. This benefits all the beekeepers for several miles around. 5. Practice good swarm control ensuring others’ phones do not repeatedly ring with swarm calls every sunny day in May and June. Clip your queens and deploy some bait hives as an insurance for when you mess up your swarm control. After all, we know bees don’t read the books! 6. Avoid overstocking, so there is sufficient forage year-round for all the colonies in the area. 7. Generously share details of farmers growing sought after crops like borage. 8. Be on call for any beekeeping emergencies whilst your neighbours go on holiday. Likewise, offer help if they are unwell. 9. Monitor the health of your bees, keep Varroa levels low, and so avoid mites spreading to your neighbour’s bees. 10. Never muscle in on your neighbour’s honey outlet. Consider selling them a bucket of honey if they are short. |
||
| Result: | – | ||
| Entrant ID: | 1039854 | Entrant Name: | Fiona Cook |
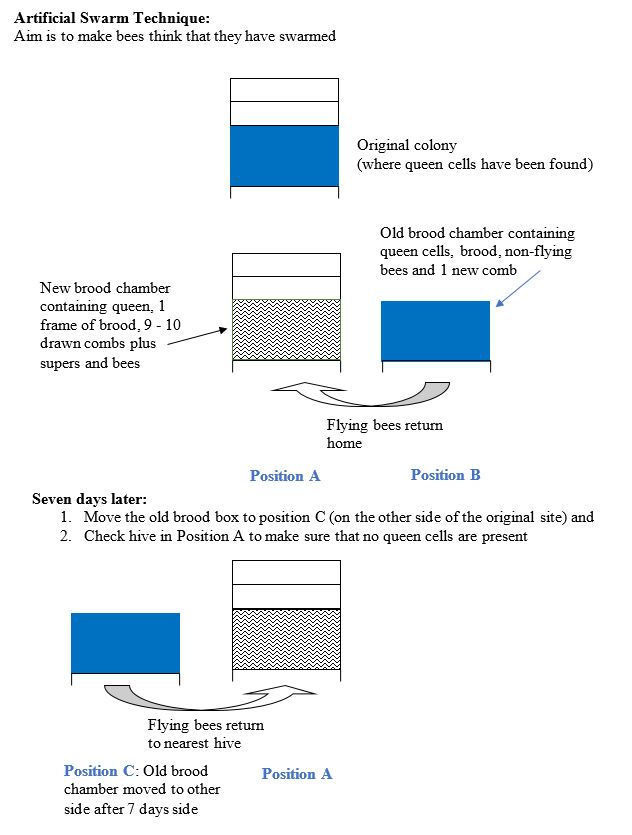
| Entry: | How to …. Carry out an Artificial Swarm
Introduction Swarming is a natural part of honeybee reproduction. There are several triggers such as overcrowding (which can happen for various reasons for example, if supers are not put on early enough or bees do not fly due to the weather) or an older queen (that produces less pheromones). If swarming does occur the majority of flying bees and the old queen will leave the hive. They leave the house bees tend for the queen cells. A beekeeper that loses a swarm ends up with a reduced honey crop from that colony and annoyed neighbours. Checking colonies regularly in swarming season (variable but normally April to July) can alert the beekeeper that swarming is about owing to appearance of queen cells on the frames. If queen cells are seen, the artificial swarm technique can be used to fool the bees into thinking that they have already swarmed by providing them a new home. Preparation In most seasons one or more of your colonies will want to swarm – if you are prepared for what to do when you find a queen cell then you can calmly carry out an artificial swarm (see the tips below). In swarming season plan your visit to the apiary and take a spare set of equipment. Tips
How to Carry out an Artificial Swarm if you find Queen cells
Diagram to show how to carry out an artificial swarm
|
||
| Result: |  |
||